Skip to content


cacti 监控 mysql status

项目网址
http://code.google.com/p/mysql-cacti-templates/

下载包并取出ss_get_mysql_stats.php 文件

wget http://mysql-cacti-templates.googlecode.com/files/better-cacti-templates-1.1.7.tar.gz
tar zxvf better-cacti-templates-1.1.7.tar.gz
cd better-cacti-templates-1.1.7/scripts/
cp ss_get_mysql_stats.php /opt/htdocs/www/cacti/scripts/
cd !$
chown www:website ss_get_mysql_stats.php
chmod 0775 ss_get_mysql_stats.php
vi ss_get_mysql_stats.php

修改 ss_get_mysql_stats.php 中mysql配置

$mysql_user = ‘cacti’;
$mysql_pass = ‘cacti’;
$cache_dir = “/opt/htdocs/www/cacti/cache/”;

创建缓存目录

cd ..
mkdir cache
chown www:website cache
chmod 0775 cache

mysql 创建用户cacti
给予process 权限,如果要监控InnoDB状态,还必须有”SUPER”权限


CREATE USER ‘cacti’@’192.168.0.1’ IDENTIFIED BY ‘***’;
GRANT PROCESS ON * . * TO ‘cacti’@’192.168.0.1’ IDENTIFIED BY ‘***’ WITH MAX_QUERIES_PER_HOUR 0 MAX_CONNECTIONS_PER_HOUR 0 MAX_UPDATES_PER_HOUR 0 MAX_USER_CONNECTIONS 0 ;

在cacti管理界面Import Templates导入
cacti_host_template_x_mysql_server_ht_0.8.6i-sver1.1.7.xml

添加图表
New Graphs 选择已有Devices在Associated Graph Templates中添加
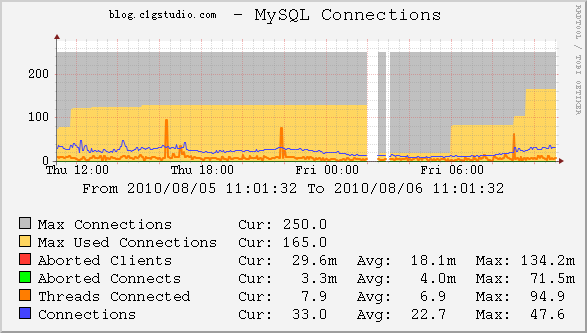
X MySQL Connections GT
然后点击Create按钮
过几分钟就可以看到图表

cacti_mysql

====================2014-10-27更新
支持多端口
1. 在Console -> Data Templates 找到mysql-cacti-templates的mysql模板,
在这里面把Port的Use Per-Data Source Value (Ignore this Value)选中,意思是由用户输入这个参数的值,然后保存。
2. 在Console->Data Input Methods内,把所有有关mysql数据项的Port都改成不请允许为空
取消选中Allow Empty Input,保存。

3. 上面全部改完后,在创建图型的时候会提示输入端口:
输入你自己的mysql server端口。然后点create就好了。

参考
http://xok.la/2009/05/cacti_mysql_monitor.html
http://www.linuxidc.com/Linux/2011-08/41438.htm

Posted in Cacti, 技术.

Tagged with , , .


cacti 监控 nginx status 支持ip及用户验证

Cacti监控主机:192.168.0.1

Nginx被监控服务器:192.168.0.2

1。首先在编译nginx时允许http_stub_status_module,不然是监控不到nginx的运行状态的

2。编辑配置文件,在要监控的虚拟主机里加入如下内容:

# vi /opt/nginx/conf/nginx.conf
###nginx monitor
location /nginx_status {
stub_status on;
access_log off;
allow 192.168.0.1;
deny all;
}

3。重新加载nginx的配置文件

# /etc/init.d/nginx restart

4。下载cacti for nginx插件包

# wget http://forums.cacti.net/download.php?id=12676
解压后一共有5个文件

# tar xvfz cacti-nginx.tar.gz

cp get_nginx_clients_status.pl /scripts/
cp get_nginx_socket_status.pl /scripts/
chmod 0755 /scripts/get_nginx_socket_status.pl
chmod 0755 /scripts/get_nginx_clients_status.pl

5。 检查插件
get_nginx_clients_status.pl http://nginx.server.tld/nginx_status

可以看到如下返回:

nginx_accepts:113869 nginx_handled:113869 nginx_requests:122594

6。在后台导入模板文件Import Templates->
Import Template from Local File
把2个监控模板文件导入
cacti_graph_template_nginx_clients_stat.xml
cacti_graph_template_nginx_sockets_stat.xml

7。添加图表
New Graphs 选择已有Devices在Associated Graph Templates中添加
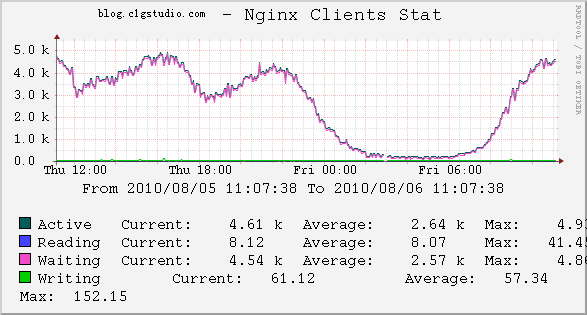
Nginx Clients Stat
保存后输入地址如:http://192.168.0.2/nginx
过几分钟就可以看到图表

nginx status 带身份认证

auth_basic “Web_ADMIN”;
auth_basic_user_file htpasswd;

方法一:
使用带认证的地址
http://username:[email protected]/nginx

方法二:
修改下get_nginx_clients_status.pl ,把adminname和password换成你的。
适用于所有的主机都使用相同的用户和密码。

15 my $ua = LWP::UserAgent->new(timeout => 5);
16 my $req = HTTP::Headers->new;
17 $req = HTTP::Request->new(GET => $ARGV[0]);
18
19 $req->authorization_basic(‘adminname’,’password’);
20
21 #my $response = $ua->request(HTTP::Request->new(‘GET’,$ARGV[0]));
22 my $response = $ua->request($req);
23
24 my @content = split (/\n/, $response->content);

cacti_nginx

参考:
http://forums.cacti.net/about26458.html
http://www.sitepoint.com/forums/showthread.php?t=597455

Posted in Cacti, 技术.

Tagged with , , .


wordpress open_basedir restriction in effect问题

nginx-0.8.46
php-5.2.14
mysql-5.1.37
eaccelerator-0.9.6.1
wordpress 为官方3.0英文版

安装后在页面出现错误信息

Warning: require() [function.require]: open_basedir restriction in effect. File() is not within the allowed path(s): (/opt/htdocs:/opt/lampp/htdocs:/opt/php/lib/php:/tmp/session:/tmp/upload) in /opt/lampp/htdocs/wordpress/wp-settings.php on line 132

php.ini 中的配置也没错

open_basedir = “/opt/htdocs:/opt/lampp/htdocs:/opt/php/lib/php:/tmp/session:/tmp/upload”

关闭open_basedir或去掉[eaccelerator]之后不会报错,安全起见open_basedir一定要开,eaccelerator换成0.9.5.3后没问题了。


tar jxvf eaccelerator-0.9.5.3.tar.bz2
cd eaccelerator-0.9.5.3/
/opt/php/bin/phpize
./configure –enable-eaccelerator=shared –with-php-config=/opt/php/bin/php-config
make
make install

参考:
http://linux.chinaunix.net/bbs/redirect.php?tid=1162653&goto=lastpost

Posted in PHP, 技术.

Tagged with , , .


Linux下硬盘检测工具smartmontools(smartctl)使用方法

安装:
yum install smartmontools

help:
#smartctl –help
smartctl version 5.38 [i686-redhat-linux-gnu] Copyright (C) 2002-8 Bruce Allen
Home page is http://smartmontools.sourceforge.net/

Usage: smartctl [options] device

============================================ SHOW INFORMATION OPTIONS =====

-h, –help, –usage
Display this help and exit

-V, –version, –copyright, –license
Print license, copyright, and version information and exit

-i, –info
Show identity information for device

-a, –all
Show all SMART information for device

================================== SMARTCTL RUN-TIME BEHAVIOR OPTIONS =====

-q TYPE, –quietmode=TYPE (ATA)
Set smartctl quiet mode to one of: errorsonly, silent, noserial

-d TYPE, –device=TYPE
Specify device type to one of: ata, scsi, marvell, sat, 3ware,N

-T TYPE, –tolerance=TYPE (ATA)
Tolerance: normal, conservative, permissive, verypermissive

-b TYPE, –badsum=TYPE (ATA)
Set action on bad checksum to one of: warn, exit, ignore

-r TYPE, –report=TYPE
Report transactions (see man page)

-n MODE, –nocheck=MODE (ATA)
No check if: never, sleep, standby, idle (see man page)

============================== DEVICE FEATURE ENABLE/DISABLE COMMANDS =====

-s VALUE, –smart=VALUE
Enable/disable SMART on device (on/off)

-o VALUE, –offlineauto=VALUE (ATA)
Enable/disable automatic offline testing on device (on/off)

-S VALUE, –saveauto=VALUE (ATA)
Enable/disable Attribute autosave on device (on/off)

======================================= READ AND DISPLAY DATA OPTIONS =====

-H, –health
Show device SMART health status

-c, –capabilities (ATA)
Show device SMART capabilities

-A, –attributes
Show device SMART vendor-specific Attributes and values

-l TYPE, –log=TYPE
Show device log. TYPE: error, selftest, selective, directory,
background, scttemp[sts,hist]

-v N,OPTION , –vendorattribute=N,OPTION (ATA)
Set display OPTION for vendor Attribute N (see man page)

-F TYPE, –firmwarebug=TYPE (ATA)
Use firmware bug workaround: none, samsung, samsung2,
samsung3, swapid

-P TYPE, –presets=TYPE (ATA)
Drive-specific presets: use, ignore, show, showall

============================================ DEVICE SELF-TEST OPTIONS =====

-t TEST, –test=TEST
Run test. TEST: offline short long conveyance select,M-N
pending,N afterselect,[on|off] scttempint,N[,p]

-C, –captive
Do test in captive mode (along with -t)

-X, –abort
Abort any non-captive test on device

=================================================== SMARTCTL EXAMPLES =====

smartctl –all /dev/hda (Prints all SMART information)

smartctl –smart=on –offlineauto=on –saveauto=on /dev/hda
(Enables SMART on first disk)

smartctl –test=long /dev/hda (Executes extended disk self-test)

smartctl –attributes –log=selftest –quietmode=errorsonly /dev/hda
(Prints Self-Test & Attribute errors)
smartctl –all –device=3ware,2 /dev/sda
smartctl –all –device=3ware,2 /dev/twe0
smartctl –all –device=3ware,2 /dev/twa0
(Prints all SMART info for 3rd ATA disk on 3ware RAID controller)
smartctl –all –device=hpt,1/1/3 /dev/sda
(Prints all SMART info for the SATA disk attached to the 3rd PMPort
of the 1st channel on the 1st HighPoint RAID controller)

简单用法:
1、smartctl -a 检查该设备是否已经打开SMART技术。
2、smartctl -s on 如果没有打开SMART技术,使用该命令打开SMART技术。
3、smartctl -t short 后台检测硬盘,消耗时间短;
smartctl -t long 后台检测硬盘,消耗时间长;
smartctl -C -t short 前台检测硬盘,消耗时间短;
smartctl -C -t long 前台检测硬盘,消耗时间长。其实就是利用硬盘SMART的自检程序。
4、smartctl -X 中断后台检测硬盘。
5、smartctl -l selftest 显示硬盘检测日志。
6、smartctl -l error 显示硬盘错误汇总。

Posted in Linux 命令, 技术.

Tagged with , .


Connection closed by remote server

#ssh -p 6022 [email protected]

Connection closed by 192.168.0.18

再ping一下,也没问题
#ping 192.168.0.18

PING 192.168.0.18 (192.168.0.18) 56(84) bytes of data.
64 bytes from 192.168.0.18: icmp_seq=1 ttl=64 time=1.09 ms
64 bytes from 192.168.0.18: icmp_seq=2 ttl=64 time=0.215 ms
64 bytes from 192.168.0.18: icmp_seq=3 ttl=64 time=0.138 ms

— 192.168.0.18 ping statistics —
3 packets transmitted, 3 received, 0% packet loss, time 1999ms
rtt min/avg/max/mdev = 0.138/0.481/1.090/0.431 ms

看了下web也可以访问,再看一下ssh的详细信息
#ssh -vv -p 6022 192.168.0.18

OpenSSH_4.3p2, OpenSSL 0.9.8e-fips-rhel5 01 Jul 2008
debug1: Reading configuration data /etc/ssh/ssh_config
debug1: Applying options for *
debug2: ssh_connect: needpriv 0
debug1: Connecting to 192.168.0.18 [192.168.0.18] port 6022.
debug1: Connection established.
debug1: identity file /home/c1g/.ssh/identity type -1
debug1: identity file /home/c1g/.ssh/id_rsa type -1
debug1: identity file /home/c1g/.ssh/id_dsa type -1
debug1: loaded 3 keys
debug1: Remote protocol version 2.0, remote software version OpenSSH_4.3
debug1: match: OpenSSH_4.3 pat OpenSSH*
debug1: Enabling compatibility mode for protocol 2.0
debug1: Local version string SSH-2.0-OpenSSH_4.3
debug2: fd 3 setting O_NONBLOCK
debug1: SSH2_MSG_KEXINIT sent
debug1: SSH2_MSG_KEXINIT received
debug2: kex_parse_kexinit: diffie-hellman-group-exchange-sha1,diffie-hellman-group14-sha1,diffie-hellman-group1-sha1
debug2: kex_parse_kexinit: ssh-rsa,ssh-dss
debug2: kex_parse_kexinit: aes128-cbc,3des-cbc,blowfish-cbc,cast128-cbc,arcfour128,arcfour256,arcfour,aes192-cbc,aes256-cbc,[email protected],aes128-ctr,aes192-ctr,aes256-ctr
debug2: kex_parse_kexinit: hmac-md5,hmac-sha1,hmac-ripemd160,[email protected],hmac-sha1-96,hmac-md5-96
debug2: kex_parse_kexinit: none,[email protected],zlib
debug2: kex_parse_kexinit:
debug2: kex_parse_kexinit: first_kex_follows 0
debug2: kex_parse_kexinit: reserved 0
debug2: kex_parse_kexinit: diffie-hellman-group-exchange-sha1,diffie-hellman-group14-sha1,diffie-hellman-group1-sha1
debug2: kex_parse_kexinit: ssh-rsa,ssh-dss
debug2: kex_parse_kexinit: aes128-cbc,3des-cbc,blowfish-cbc,cast128-cbc,arcfour128,arcfour256,arcfour,aes192-cbc,aes256-cbc,[email protected],aes128-ctr,aes192-ctr,aes256-ctr
debug2: kex_parse_kexinit: hmac-md5,hmac-sha1,hmac-ripemd160,[email protected],hmac-sha1-96,hmac-md5-96
debug2: kex_parse_kexinit: none,[email protected]
debug2: kex_parse_kexinit:
debug2: kex_parse_kexinit: first_kex_follows 0
debug2: kex_parse_kexinit: reserved 0
debug2: mac_init: found hmac-md5
debug1: kex: server->client aes128-cbc hmac-md5 none
debug2: mac_init: found hmac-md5
debug1: kex: client->server aes128-cbc hmac-md5 none
debug1: SSH2_MSG_KEX_DH_GEX_REQUEST(1024<1024<8192) sent debug1: expecting SSH2_MSG_KEX_DH_GEX_GROUP debug2: dh_gen_key: priv key bits set: 136/256 debug2: bits set: 532/1024 debug1: SSH2_MSG_KEX_DH_GEX_INIT sent debug1: expecting SSH2_MSG_KEX_DH_GEX_REPLY debug1: Host '192.168.0.18' is known and matches the RSA host key. debug1: Found key in /home/c1g/.ssh/known_hosts:4 debug2: bits set: 513/1024 debug1: ssh_rsa_verify: signature correct debug2: kex_derive_keys debug2: set_newkeys: mode 1 debug1: SSH2_MSG_NEWKEYS sent debug1: expecting SSH2_MSG_NEWKEYS debug2: set_newkeys: mode 0 debug1: SSH2_MSG_NEWKEYS received debug1: SSH2_MSG_SERVICE_REQUEST sent debug2: service_accept: ssh-userauth debug1: SSH2_MSG_SERVICE_ACCEPT received debug2: key: /home/c1g/.ssh/identity ((nil)) debug2: key: /home/c1g/.ssh/id_rsa ((nil)) debug2: key: /home/c1g/.ssh/id_dsa ((nil)) debug1: Authentications that can continue: publickey,gssapi-with-mic,password debug1: Next authentication method: gssapi-with-mic debug1: Unspecified GSS failure. Minor code may provide more information Unknown code krb5 195 debug1: Unspecified GSS failure. Minor code may provide more information Unknown code krb5 195 debug1: Unspecified GSS failure. Minor code may provide more information Unknown code krb5 195 debug2: we did not send a packet, disable method debug1: Next authentication method: publickey debug1: Trying private key: /home/c1g/.ssh/identity debug1: Trying private key: /home/c1g/.ssh/id_rsa debug1: Trying private key: /home/c1g/.ssh/id_dsa debug2: we did not send a packet, disable method debug1: Next authentication method: password [email protected]'s password: debug2: we sent a password packet, wait for reply Connection closed by 192.168.0.18

在输入密码后就断掉了,把机器重启下后,可以登录了。

查看/var/log/messages 和 /var/log/cron
发现从凌晨3点起就没有记录了,估计是磁盘出错变成不可写适成不能登录。

Posted in LINUX, 技术.

Tagged with .


RRDtool 1.4.4 安装

RRDtool介绍

rrdtool-3dlogo
RRDTool是由Tobias Oetiker开发的自由软件,它使用RRD(Round Robin Database)作为存储格式,Round robin是一种处理定量数据、以及当前元素指针的技术。RRDTool主要用来跟踪对象的变化情况,生成这些变化的走势图。

stream-pop

07/09/10释放的cacti-0.8.7g已支持rrdtool-1.4X
我选择05-Jul-2010 最新释放的rrdtool-1.4.4.tar.gz
系统为centos 5.2,已安装yum

安装支持包
yum install libxml2-devel libpng-devel pkg-config glib pixman pango pango-devel freetype freetype-devel fontconfig cairo cairo-devel libart_lgpl libart_lgpl-devel

安装rrdtool

wget http://oss.oetiker.ch/rrdtool/pub/rrdtool-1.4.4.tar.gz
tar zxvf rrdtool-1.4.4.tar.gz
cd rrdtool-1.4.4
./configure –prefix=/usr/local/rrdtool-1.4.4 –disable-tcl –disable-python


ordering CD from http://tobi.oetiker.ch/wish …. just kidding ;-)

—————————————————————-
Config is DONE!

With MMAP IO: yes
Build rrd_getopt: no
Static programs: no
Perl Modules: perl_piped perl_shared
Perl Binary: /usr/bin/perl
Perl Version: 5.8.8
Perl Options: PREFIX=/usr/local/rrdtool-1.4.4 LIB=/usr/local/rrdtool-1.4.4/lib/perl/5.8.8
Ruby Modules:
Ruby Binary: no
Ruby Options: sitedir=/usr/local/rrdtool-1.4.4/lib/ruby
Build Lua Bindings: no
Build Tcl Bindings: no
Build Python Bindings: no
Build rrdcgi: yes
Build librrd MT: yes
Use gettext: yes
With libDBI: no

Libraries: -lxml2 -lcairo -lcairo -lcairo -lm -lcairo -lpng12 -lglib-2.0 -lpangocairo-1.0 -lpango-1.0 -lcairo -lgobject-2.0 -lgmodule-2.0 -ldl -lglib-2.0

Type ‘make’ to compile the software and use ‘make install’ to
install everything to: /usr/local/rrdtool-1.4.4.

出现下面信息可能缺少支持包

configure: error: Please fix the library issues listed above and try again.


make
make install

ln -s /usr/local/rrdtool-1.4.4 /usr/local/rrdtool
/usr/local/rrdtool/bin/rrdtool -v


RRDtool 1.4.4 Copyright 1997-2010 by Tobias Oetiker
Compiled Jul 22 2010 11:18:48

Usage: rrdtool [options] command command_options
Valid commands: create, update, updatev, graph, graphv, dump, restore,
last, lastupdate, first, info, fetch, tune,
resize, xport, flushcached

RRDtool is distributed under the Terms of the GNU General
Public License Version 2. (www.gnu.org/copyleft/gpl.html)

For more information read the RRD manpages

参考:
rrdtool 1.3.7安装
http://blog.c1gstudio.com/archives/459

Posted in RRDtool.

Tagged with .


cacti 监控远程主机

环境介绍
安装cacti的监控机A,ip为 192.168.0.16
安装snmp的被监控机B,ip为 192.168.0.17
系统为centos 4/5

被监控B机安装snmp
net-snmp 安装参考

修改B机snmp配置,充许外部访问
自带的snmp配置文件在/etc/snmp/snmpd.conf;
编译安装的snmp配置文件在/usr/local/etc/snmp/snmpd.conf;
vi /etc/snmp/snmpd.conf

com2sec local localhost privatepass #安装教程中配置的本机访问要权限
com2sec mynetwork 192.168.0.16 privatepass #新增的外部访问权限,192.168.0.16为监控机ip,privatepass 为安全码可以和local不同

group MyROGroup v1 local
group MyROGroup v2c local
group MyROGroupnet v1 mynetwork #新增
group MyROGroupnet v2c mynetwork #新增

view mib2 included .iso.org.dod.internet.mgmt.mib-2 fc
view all included .1 80 #新增

access MyROGroup “” any noauth exact mib2 none none
access MyROGroupnet “” any noauth exact all none none #新增

#以下为访问项目,如果想监控磁盘空间,load等需把注释去掉
#编译安装默认已去掉,自带安装的需手动把注释去掉

# Make sure mountd is running
proc mountd #去掉前面的”#”

# Make sure there are no more than 4 ntalkds running, but 0 is ok too.
proc ntalkd 4

# Make sure at least one sendmail, but less than or equal to 10 are running.
proc sendmail 10 1

# Check the / partition and make sure it contains at least 10 megs.

disk / 10000

# Check for loads:
load 12 14 14

重启snmpd服务
#/etc/init.d/snmpd restart

#killall -9 snmpd
#/usr/local/sbin/snmpd

iptables规则
假如B机开启了iptables并且INPUT默认策略为DROP
在第一条插入充许192.168.0.16(监控机)以udp协议访问snmpd默认161端口的规则

/sbin/iptables -I INPUT -p udp -m udp -s 192.168.0.16 –dport 161 -j ACCEPT

保存一下,防止重启服务后失效

/etc/init.d/iptables save

测试snmp
在A机上先看下系统信息
#snmpwalk -v 2c -c privatepass 192.168.0.17 system

SNMPv2-MIB::sysDescr.0 = STRING: Linux touareg 2.6.18-128.el5 #1 SMP Wed Jan 21 10:41:14 EST 2009 x86_64
SNMPv2-MIB::sysObjectID.0 = OID: NET-SNMP-MIB::netSnmpAgentOIDs.10
DISMAN-EVENT-MIB::sysUpTimeInstance = Timeticks: (59664) 0:09:56.64
SNMPv2-MIB::sysContact.0 = STRING: Root (configure /etc/snmp/snmp.local.conf)
SNMPv2-MIB::sysName.0 = STRING: touareg
SNMPv2-MIB::sysLocation.0 = STRING: Unknown (edit /etc/snmp/snmpd.conf)
SNMPv2-MIB::sysORLastChange.0 = Timeticks: (7) 0:00:00.07
SNMPv2-MIB::sysORID.1 = OID: SNMPv2-MIB::snmpMIB
SNMPv2-MIB::sysORID.2 = OID: TCP-MIB::tcpMIB
SNMPv2-MIB::sysORID.3 = OID: IP-MIB::ip
SNMPv2-MIB::sysORID.4 = OID: UDP-MIB::udpMIB
SNMPv2-MIB::sysORID.5 = OID: SNMP-VIEW-BASED-ACM-MIB::vacmBasicGroup
SNMPv2-MIB::sysORID.6 = OID: SNMP-FRAMEWORK-MIB::snmpFrameworkMIBCompliance
SNMPv2-MIB::sysORID.7 = OID: SNMP-MPD-MIB::snmpMPDCompliance
SNMPv2-MIB::sysORID.8 = OID: SNMP-USER-BASED-SM-MIB::usmMIBCompliance
SNMPv2-MIB::sysORDescr.1 = STRING: The MIB module for SNMPv2 entities
SNMPv2-MIB::sysORDescr.2 = STRING: The MIB module for managing TCP implementations
SNMPv2-MIB::sysORDescr.3 = STRING: The MIB module for managing IP and ICMP implementations
SNMPv2-MIB::sysORDescr.4 = STRING: The MIB module for managing UDP implementations
SNMPv2-MIB::sysORDescr.5 = STRING: View-based Access Control Model for SNMP.
SNMPv2-MIB::sysORDescr.6 = STRING: The SNMP Management Architecture MIB.
SNMPv2-MIB::sysORDescr.7 = STRING: The MIB for Message Processing and Dispatching.
SNMPv2-MIB::sysORDescr.8 = STRING: The management information definitions for the SNMP User-based Security Model.
SNMPv2-MIB::sysORUpTime.1 = Timeticks: (6) 0:00:00.06
SNMPv2-MIB::sysORUpTime.2 = Timeticks: (6) 0:00:00.06
SNMPv2-MIB::sysORUpTime.3 = Timeticks: (6) 0:00:00.06
SNMPv2-MIB::sysORUpTime.4 = Timeticks: (6) 0:00:00.06
SNMPv2-MIB::sysORUpTime.5 = Timeticks: (6) 0:00:00.06
SNMPv2-MIB::sysORUpTime.6 = Timeticks: (7) 0:00:00.07
SNMPv2-MIB::sysORUpTime.7 = Timeticks: (7) 0:00:00.07
SNMPv2-MIB::sysORUpTime.8 = Timeticks: (7) 0:00:00.07

没有问题,再看下磁盘信息
#snmpwalk -v 2c -c privatepass 192.168.0.17 .1.3.6.1.4.1.2021.9

UCD-SNMP-MIB::dskIndex.1 = INTEGER: 1
UCD-SNMP-MIB::dskPath.1 = STRING: /
UCD-SNMP-MIB::dskDevice.1 = STRING: /dev/mapper/VolGroup00-LogVol01
UCD-SNMP-MIB::dskMinimum.1 = INTEGER: 10000
UCD-SNMP-MIB::dskMinPercent.1 = INTEGER: -1
UCD-SNMP-MIB::dskTotal.1 = INTEGER: 44628400
UCD-SNMP-MIB::dskAvail.1 = INTEGER: 22383404
UCD-SNMP-MIB::dskUsed.1 = INTEGER: 19941408
UCD-SNMP-MIB::dskPercent.1 = INTEGER: 47
UCD-SNMP-MIB::dskPercentNode.1 = INTEGER: 1
UCD-SNMP-MIB::dskErrorFlag.1 = INTEGER: noError(0)
UCD-SNMP-MIB::dskErrorMsg.1 = STRING:


出现下面这个信息,你需要检查下A机snmpd.conf中“disk / 10000”前的注释有无去掉。

UCD-SNMP-MIB::dskTable = No Such Object available on this agent at this OID

“.1.3.6.1.4.1.2021.9″代表磁盘
“.1.3.6.1.4.1.2021.10″代表load,可以参考snmpd.conf中的注释

监控机cacti增加监控设备
Console -> Devices->add
cacti add device
在设置页面配置

Description:touareg
Hostname:192.168.0.17
Host Template:ucd/net SNMP Host

Downed Device Detection:Ping and SNMP

SNMP Version:预定义的设置

保存后在页面左上角可以看到调试信息

touareg (192.168.0.17)
SNMP Information
System:Linux touareg 2.6.18-128.el5 #1 SMP Wed Jan 21 10:41:14 EST 2009
x86_64
Uptime: 38790 (0 days, 0 hours, 6 minutes)
Hostname: touareg
Location: Unknown (edit /etc/snmp/snmpd.conf)
Contact: Root root@localhost (configure /etc/snmp/snmp.local.conf)

cacti graphs

1) ucd/net – CPU Usage Not Being Graphed (cpu负载,system,user,nice)
2) ucd/net – Load Average Not Being Graphed (系统平均负载,1分钟,5分钟,15分钟)
3) ucd/net – Memory Usage Not Being Graphed (内存使用,free,buffers,cache)

1) SNMP – Interface Statistics (网卡流量,in,out)
2) ucd/net – Get Monitored Partitions (根分区,free,used)

Not Being Graphed 表示还末生成图像,创建图像后会变成Is Being Graphed
我们可以再添加一些更详细的监控
Host MIB – Processes 监控进程数量
Host MIB – Logged in Users 监控登录用户

SNMP – Get Mounted Partitions 更多分区大小,Memory Buffer,Real Memory,Swap Space
SNMP – Get Processor Information 每个cpu的负载

临控对像增加图表
左则New Graphs
在host中选择touareg
cacti graphs2
勾选右则后选择create,就完成了图表创建,真是很方便。

添加到Graph Trees
图表创建后在Graph Management里可以看到图表,但点击导航上方的”graphs”是看不到的,需要添加到graph trees中。
Console -> Graph Trees -> (Edit) -> Graph Tree Items

Tree Item Type:host
Host:touareg

创建后就可以在graph中看到了
cacti graph tree

参考:http://docs.cacti.net/manual:087:2_basics.0_principles_of_operation#principles_of_operation

Posted in Cacti, 技术.

Tagged with , .


在 Android 手机上运行 PHP

PHP可不仅仅只能在互联网站上发展,一个PHP for Android (PFA)网站表示他们将可以发布编程模型、工具盒文档让PHP在Android上实现应用。该项目的主要赞助商是开源公司IronTec,PFA使用Scripting Layer for Android (SL4A),也就是Androd Scripting Environment (ASE)来实现这一点,您可以参看他们的网站来了解更多技术内幕。

1.下载并安装ASE
扫描下面的二维码,可在你的手机上安装个条码扫描器(BarcodeScanner)

或用浏览器下载并安装
http://phpforandroid.net/files/ASEr26unofficial.apk

2.安装PhpForAndroid.apk

或用浏览器下载并安装
http://phpforandroid.net/files/PhpForAndroid_r1.apk

3.运行
安装好PhpForAndroid_r1.apk后再运行ASE就可以看到5个php demo
hello_world.php

getInput(“Hi!”, “What is your name?”);
$droid->makeToast(‘Hello, ‘ . $name[‘result’]);

list_items.php

dialogCreateAlert();
$droid->dialogSetItems(range(0, 9));
$droid->dialogShow();

phpinfo.php

testnow.php

vibrate.php

vibrate();

点击phpinfo.php文件开始运行;
程序会输出php的相关信息,当前使用的php版本为5.3.3rc2

$ export TEMP=”/sdcard/ase/extras/php/tmp”
$ export AP_PORT=”37356″
$ export PHPHOME=”/data/data/com.irontec.phpforandroid/php”
$ export PHPPATH=”/sdcard/ase/extras/php”
$ /data/data/com.irontec.phpforandroid/php/bin/php -c $PHPPATH /sdcard/ase/scripts/phpinfo.php
FIX ME! implement getprotobyname() bionic/libc/bionic/stubs.c:402
phpinfo()
PHP Version => 5.3.3RC2
System => Linux localhost 2.6.29.6-xdan #20 PREEMPT Sat Mar 27 03:36:57 EDT 2010 armv6l
Build Date => Jul 4 2010 19:40:10
Configure Command => ‘./configure’ ‘–disable-all’ ‘–target=arm-linux’ ‘–enable-cli’ ‘–enable-json’ ‘–enable-sockets’
Server API => Command Line Interface
Virtual Directory Support => disabled
Configuration File (php.ini) Path => /usr/local/lib
Loaded Configuration File => /sdcard/ase/extras/php/php.ini
Scan this dir for additional .ini files => (none)
Additional .ini files parsed => (none)
PHP API => 20090626
PHP Extension => 20090626
Zend Extension => 220090626
Zend Extension Build => API220090626,NTS
PHP Extension Build => API20090626,NTS
Debug Build => no
Thread Safety => disabled
Zend Memory Manager => enabled
Zend Multibyte Support => disabled
IPv6 Support => disabled
Registered PHP Streams => php, file, data, http, ftp
Registered Stream Socket Transports => tcp, udp, unix, udg
Registered Stream Filters => string.rot13, string.toupper, string.tolower, string.strip_tags, convert.*, consumed, dechunk
This program makes use of the Zend Scripting Language Engine:
Zend Engine v2.3.0, Copyright (c) 1998-2010 Zend Technologies
_______________________________________________________________________
Configuration
Core
PHP Version => 5.3.3RC2
Directive => Local Value => Master Value
allow_call_time_pass_reference => On => On
allow_url_fopen => On => On
allow_url_include => On => On
always_populate_raw_post_data => Off => Off
arg_separator.input => & => &
arg_separator.output => & => &
asp_tags => Off => Off
auto_append_file => no value => no value
auto_globals_jit => On => On
auto_prepend_file => no value => no value
browscap => no value => no value
default_charset => no value => no value
default_mimetype => text/html => text/html
define_syslog_variables => Off => Off
disable_classes => no value => no value
disable_functions => no value => no value
display_errors => STDOUT => STDOUT
display_startup_errors => On => On
doc_root => no value => no value
docref_ext => no value => no value
docref_root => no value => no value
enable_dl => Off => Off
error_append_string => no value => no value
error_log => no value => no value
error_prepend_string => no value => no value
error_reporting => 22527 => 22527
exit_on_timeout => Off => Off
expose_php => On => On
extension_dir => /usr/local/lib/php/extensions/no-debug-non-zts-20090626 => /usr/local/lib/php/extensions/no-debug-non-zts-20090626
file_uploads => On => On
highlight.bg => #FFFFFF => #FFFFFF
highlight.comment => #FF8000 => #FF8000
highlight.default => #0000BB => #0000BB
highlight.html => #000000 => #000000
highlight.keyword => #007700 => #007700
highlight.string => #DD0000 => #DD0000
html_errors => Off => Off
ignore_repeated_errors => Off => Off
ignore_repeated_source => Off => Off
ignore_user_abort => Off => Off
implicit_flush => On => On
include_path => .:/sdcard/ase/extras/php => .:/sdcard/ase/extras/php
log_errors => Off => Off
log_errors_max_len => 1024 => 1024
magic_quotes_gpc => Off => Off
magic_quotes_runtime => Off => Off
magic_quotes_sybase => Off => Off
mail.add_x_header => Off => Off
mail.force_extra_parameters => no value => no value
mail.log => no value => no value
max_execution_time => 0 => 0
max_file_uploads => 20 => 20
max_input_nesting_level => 64 => 64
max_input_time => -1 => -1
memory_limit => 128M => 128M
open_basedir => no value => no value
output_buffering => 0 => 0
output_handler => no value => no value
post_max_size => 8M => 8M
precision => 14 => 14
realpath_cache_size => 16K => 16K
realpath_cache_ttl => 120 => 120
register_argc_argv => On => On
register_globals => Off => Off
register_long_arrays => Off => Off
report_memleaks => On => On
report_zend_debug => Off => Off
request_order => GP => GP
safe_mode => Off => Off
safe_mode_exec_dir => no value => no value
safe_mode_gid => Off => Off
safe_mode_include_dir => no value => no value
sendmail_from => no value => no value
sendmail_path => /usr/sbin/sendmail -t -i => /usr/sbin/sendmail -t -i
serialize_precision => 100 => 100
short_open_tag => On => On
SMTP => localhost => localhost
smtp_port => 25 => 25
sql.safe_mode => Off => Off
track_errors => Off => Off
unserialize_callback_func => no value => no value
upload_max_filesize => 2M => 2M
upload_tmp_dir => no value => no value
user_dir => no value => no value
user_ini.cache_ttl => 300 => 300
user_ini.filename => .user.ini => .user.ini
variables_order => GPCS => GPCS
xmlrpc_error_number => 0 => 0
xmlrpc_errors => Off => Off
y2k_compliance => On => On
zend.enable_gc => On => On
date
date/time support => enabled
“Olson” Timezone Database Version => 2010.9
Timezone Database => internal
Warning: phpinfo(): It is not safe to rely on the system’s timezone settings. You are *required* to use the date.timezone setting or the date_default_timezone_set() function. In case you used any of those methods and you are still getting this warning, you most likely misspelled the timezone identifier. We selected ‘America/Chicago’ for ‘CST/-CST/no DST’ instead in /sdcard/ase/scripts/phpinfo.php on line 4
Default timezone => America/Chicago
Directive => Local Value => Master Value
date.default_latitude => 31.7667 => 31.7667
date.default_longitude => 35.2333 => 35.2333
date.sunrise_zenith => 90.583333 => 90.583333
date.sunset_zenith => 90.583333 => 90.583333
date.timezone => no value => no value
ereg
Regex Library => Bundled library enabled
json
json support => enabled
json version => 1.2.1
pcre
PCRE (Perl Compatible Regular Expressions) Support => enabled
PCRE Library Version => 8.02 2010-03-19
Directive => Local Value => Master Value
pcre.backtrack_limit => 100000 => 100000
pcre.recursion_limit => 100000 => 100000
Reflection
Reflection => enabled
Version => $Revision: 300393 $
sockets
Sockets Support => enabled
SPL
SPL support => enabled
Interfaces => Countable, OuterIterator, RecursiveIterator, SeekableIterator, SplObserver, SplSubject
Classes => AppendIterator, ArrayIterator, ArrayObject, BadFunctionCallException, BadMethodCallException, CachingIterator, DirectoryIterator, DomainException, EmptyIterator, FilesystemIterator, FilterIterator, InfiniteIterator, InvalidArgumentException, IteratorIterator, LengthException, LimitIterator, LogicException, MultipleIterator, NoRewindIterator, OutOfBoundsException, OutOfRangeException, OverflowException, ParentIterator, RangeException, RecursiveArrayIterator, RecursiveCachingIterator, RecursiveDirectoryIterator, RecursiveFilterIterator, RecursiveIteratorIterator, RecursiveRegexIterator, RecursiveTreeIterator, RegexIterator, RuntimeException, SplDoublyLinkedList, SplFileInfo, SplFileObject, SplFixedArray, SplHeap, SplMinHeap, SplMaxHeap, SplObjectStorage, SplPriorityQueue, SplQueue, SplStack, SplTempFileObject, UnderflowException, UnexpectedValueException
standard
Dynamic Library Support => enabled
Path to sendmail => /usr/sbin/sendmail -t -i
Directive => Local Value => Master Value
assert.active => 1 => 1
assert.bail => 0 => 0
assert.callback => no value => no value
assert.quiet_eval => 0 => 0
assert.warning => 1 => 1
auto_detect_line_endings => 0 => 0
default_socket_timeout => 60 => 60
safe_mode_allowed_env_vars => PHP_ => PHP_
safe_mode_protected_env_vars => LD_LIBRARY_PATH => LD_LIBRARY_PATH
url_rewriter.tags => a=href,area=href,frame=src,form=,fieldset= => a=href,area=href,frame=src,form=,fieldset=
user_agent => no value => no value
Additional Modules
Module Name
Environment
Variable => Value
ANDROID_ROOT => /system
PHPPATH => /sdcard/ase/extras/php
LD_LIBRARY_PATH => /system/lib
PATH => /usr/bin:/usr/sbin:/bin:/sbin:/system/sbin:/system/bin:/system/xbin:/system/xbin/bb:/data/local/bin
AP_PORT => 37356
ANDROID_SOCKET_zygote => 11
TEMP => /sdcard/ase/extras/php/tmp
BOOTCLASSPATH => /system/framework/core.jar:/system/framework/ext.jar:/system/framework/framework.jar:/system/framework/android.policy.jar:/system/framework/services.jar
ANDROID_BOOTLOGO => 1
ANDROID_ASSETS => /system/app
EXTERNAL_STORAGE => /sdcard
ANDROID_DATA => /data
TERMINFO => /system/etc/terminfo
ANDROID_PROPERTY_WORKSPACE => 10,32768
PHPHOME => /data/data/com.irontec.phpforandroid/php
PHP Variables
Variable => Value
_SERVER[“ANDROID_ROOT”] => /system
_SERVER[“PHPPATH”] => /sdcard/ase/extras/php
_SERVER[“LD_LIBRARY_PATH”] => /system/lib
_SERVER[“PATH”] => /usr/bin:/usr/sbin:/bin:/sbin:/system/sbin:/system/bin:/system/xbin:/system/xbin/bb:/data/local/bin
_SERVER[“AP_PORT”] => 37356
_SERVER[“ANDROID_SOCKET_zygote”] => 11
_SERVER[“TEMP”] => /sdcard/ase/extras/php/tmp
_SERVER[“BOOTCLASSPATH”] => /system/framework/core.jar:/system/framework/ext.jar:/system/framework/framework.jar:/system/framework/android.policy.jar:/system/framework/services.jar
_SERVER[“ANDROID_BOOTLOGO”] => 1
_SERVER[“ANDROID_ASSETS”] => /system/app
_SERVER[“EXTERNAL_STORAGE”] => /sdcard
_SERVER[“ANDROID_DATA”] => /data
_SERVER[“TERMINFO”] => /system/etc/terminfo
_SERVER[“ANDROID_PROPERTY_WORKSPACE”] => 10,32768
_SERVER[“PHPHOME”] => /data/data/com.irontec.phpforandroid/php
_SERVER[“PHP_SELF”] => /sdcard/ase/scripts/phpinfo.php
_SERVER[“SCRIPT_NAME”] => /sdcard/ase/scripts/phpinfo.php
_SERVER[“SCRIPT_FILENAME”] => /sdcard/ase/scripts/phpinfo.php
_SERVER[“PATH_TRANSLATED”] => /sdcard/ase/scripts/phpinfo.php
_SERVER[“DOCUMENT_ROOT”] =>
_SERVER[“REQUEST_TIME”] => 1279269078
_SERVER[“argv”] => Array
(
[0] => /sdcard/ase/scripts/phpinfo.php
)
_SERVER[“argc”] => 1
PHP License
This program is free software; you can redistribute it and/or modify
it under the terms of the PHP License as published by the PHP Group
and included in the distribution in the file: LICENSE
This program is distributed in the hope that it will be useful,
but WITHOUT ANY WARRANTY; without even the implied warranty of
MERCHANTABILITY or FITNESS FOR A PARTICULAR PURPOSE.
If you did not receive a copy of the PHP license, or have any
questions about PHP licensing, please contact [email protected].

运行结束后就是控制台界面,按menu键会出来Exit&Edit可以进入编辑模式;
编辑模式下有API Browser可供调用,save & Run就可以调试程序了。
在我的g1,1.6固件上运行正常。

安装教程
http://www.phpforandroid.net/screencast

Posted in Android, 其它.

Tagged with , , .


google JavaScript Style Guide

Google JavaScript Style Guide
另有C++ Style Guide, Objective-C Style Guide, and Python Style Guide

http://code.google.com/p/google-styleguide/

Posted in JavaScript/DOM/XML, 技术.

Tagged with , .


cacti 安装npc 整合 nagios

Cacti是一套PHP程序,它使用snmpget命令采集数据、RRDTool绘图。Cacti界面简洁直观,让你根本无需明白RRDTool的众多参数即可轻松绘制出漂亮的图形。另外,它还提供了强大的数据管理和用户管理功能。在图像管理上,Cacti采用了树状结构的查看界面,在用户管理上,能对用户的权限进行细致划分,甚至支持使用LDAP进行用户验证。Cacti主要功能包括:数据定时采集、图像绘制与显示、树状的主机和图像管理、RRDTool信息管理、用户和权限管理以及模板导入导出等。

cactilogo

1.Cacti系统组成

  Cacti系统由4个部分组成:

  Cacti页面(PHP)——用户控制的平台,用户在此进行所有的设置;

  SNMP采集工具——Unix下使用 Net-SNMP软件包自带的“snmpget”和“snmpwalk”等程序,Windows下使用PHP的SNMP功能;

  RRDTool绘图引擎——性能数据的存储和绘画图像;

  MySQL数据库——储存RRDTool绘图所需的信息,如模板、rra、主机对应的信息等,要注意的是MySQL数据库并不保存性能数据,性能数据保存在RRDTool自己的数据库格式rrd文件中。利用Cacti可以对校园网络进行很好的实时监控,从而做到运筹帷幄。
2.菜单功能介绍

  Console菜单包括了New Graphs(创建新图像)、Graph Management(图像管理)、Graph Trees(图像树)、Data Sources(管理rrd文件)、Devices(设备管理)、 Data Queries 和Data Input Methods(采集数据方式)、Graph Templates(图像模板)、Host Templates(主机类型模板)、Data Templates(数据模板)、Import Templates(模板导入)、Export Templates(模板导出)Settings(Cacti的主要配置菜单)、System Utilities(显示Cacti系统的一些cache和log信息)、User Management(用户管理)、Logout User (用户退出登录)等菜单选项。

  Grapes菜单包括三种查看图像的形式,分别为setting、树形显示、列表型显示和预览型显示。
cacti_promo_main

在线demo:
http://status.pulpfree.org/cacti/graph_view.php?action=tree&tree_id=3&leaf_id=28&select_first=true
http://www.querx.com/cacti/graph_view.php?action=tree&tree_id=1&leaf_id=9
http://www.kende.com/cacti/graph_view.php?action=tree&tree_id=1&leaf_id=7&select_first=true
更多demo:
http://www.cacti.net/sites_that_use_cacti.php

最新版本:
The latest stable version is 0.8.7g, released 07/09/10.
http://www.cacti.net/download_cacti.php
0.8.7g版本和某些插件有兼容型问题,如npc,thold,我安装下来在顶部不能正常显示导航菜单。
cacti的版本要和插件架构匹配,我装0.8.7e+cacti-plugin-0.8.7f-PA可以使用,但顶部导航显示不正确。
这里选用0.8.7e+cacti-plugin-0.8.7e-PA

依赖关系:
安装之前需lamp环境 安装参考
net-snmp 安装参考
RRDTool 安装参考
php扩展 安装参考
php_json
pdo_mysql
sockets
nagios 安装参考
ndoutils 安装参考

下载cacti:
cd /opt/htdocs/www
wget wget http://www.cacti.net/downloads/cacti-0.8.7e.tar.gz
wget http://mirror.cactiusers.org/downloads/plugins/cacti-plugin-0.8.7e-PA-v2.6.zip
wget http://www.constructaegis.com/downloads/npc-2.0.4.tar.gz

constructaegis.com域名已过期
可以使用svn checkout
http://svn2.assembla.com/svn/npc/trunk

安装cacti:
我的nginx运行用户为www组为website
安装路径为/opt/htdocs/www

tar zxvf cacti-0.8.7e.tar.gz
mv cacti-0.8.7e cacti
chown -R www:website cacti
chmod -R 0775 cacti

安装cacti数据库:
创建cacti库,并创建cacti用户给予它cacti库权限,也可以使用phpmyadmin来完成.
导入cacti.sql到cacti库

mysql –u root –p
mysql>create database cacti;
mysql>use cacti;
Mysql>source /opt/htdocs/www/cacti/cacti.sql
Mysql>grant all privileges on cacti.* to cacti@localhost identified by ‘cactipass’;
#添加一个数据库账号cacti 密码为cactipass 用以访问cacti库
Mysql>flush privileges; #刷新权限信息

配置cacti数据库信息
#cd cacti
#vi include/config.php

$database_type = “mysql”;
$database_default = “cacti”;
$database_hostname = “localhost”;
$database_username = “cactiuser”;
$database_password = “cacti”;

配置cacti自动运行:
#crontab -e

*/5 * * * * /opt/php/bin/php /opt/htdocs/www/cacti/poller.php > /dev/null 2>&1

Spine更有效率可以选择性安装

配置cacti:
访问cacti的web地址,就会显示安装界面
http://nagios.c1gstudio.com/cacti/

1.选择”新的安装”

2.配置路径(以系统中实际安装路径为准)
/usr/local/rrdtool/bin/rrdtool
/opt/php/bin/php
/usr/local/bin/snmpwalk
/usr/local/bin/snmpget
/usr/local/bin/snmpbulkwalk
/usr/local/bin/snmpgetnext

3.默认用户名及密码
admin/admin
接着输入新的密码

4.进入cacti后台
设置相应版本及验证码
settings->General
RRDTool Utility Version = RRDTool1.3.X
SNMP Version = 2
SNMP Community = 你的验证码(privatepass )
save

5.查看报表
点graphs选项5分钟后应该可以看到4个报表.
memory usage
load average
logged in users
processers

6.创建磁盘监控
在首页点击Create graphs然后在Data Query栏目中勾上需要监控的分区保存.

以上完成了cacti安装,下面安装插件
在安装插件前需先安装”插件框架”

安装插件框架:
1.解压

cd /opt/htdocs/www
unzip cacti-plugin-0.8.7e-PA-v2.6.zip
chown -R www:website cacti-plugin-arch/
chmod -R 0775 cacti-plugin-arch

2.导入数据库结构

mysql -u cacti -p cacti
3.覆盖文件
方法一:覆盖

cp –rf cacti-plugin-arch/files-0.8.7e/* /opt/htdocs/www/cacti

方法二:打补丁

cp cacti-plugin-arch/cacti-plugin-0.8.7e-PA-v2.6.diff /opt/htdocs/www/cacti/
cd /opt/htdocs/www/cacti/
patch -p1 -N
我用方法一

4.配置插件的数据库信息
#cd /opt/htdocs/www/cacti/
#vi include/global.php
#插件数据库需再配置一下

$database_type = “mysql”;
$database_default = “cacti”;
$database_hostname = “localhost”;
$database_username = “cactiuser”;
$database_password = “cacti”;

5.配制插件

#我的cacti安装在域下的cacti目录,这里也需修改
$config[‘url_path’] = ‘/cacti/’;

#为后面安装npc增加变量
$plugins[] = ‘npc’;

注:0.8.7g开始上面两变量改放在includes/config.php中,如果参照以前的教程会找不到了囧
参见Change Log
http://forums.cacti.net/viewtopic.php?t=38492

安装NPC插件:
1.解压后移到plugins目录下

cd /opt/htdocs/www
unzip npc.zip
chown -R www:website npc
chmod -R 0775 npc
mv npc cacti/plugins/

2.启用cacti的插件功能,
以admin用户登陆cacti,在console中的user management里对admin的用户权限进行编辑,
勾选上Plugin Management、NPC、NPC Global Commands
然后到Plugin Management
安装并启用NPC即可。
在Settings->npc中
勾上Remote Commands
Nagios Command File Path=/usr/local/nagios/var/rw/nagios.cmd
Nagios URL=你的地址(http://nagios.c1gstudio.com/nagios/)

3.配置ndoutils
参见

如果一切正常点击导航菜单npc后就可以看到信息了。
没有显示可能有以下原因:

  1. cacti和npc版本不兼容
  2. cacti和plugin框架版本不一致
  3. npc没有正确安装(数据库结构不对)
  4. ndoutils没有正确配置(数据库中无信息)
  5. php-json,pdo_mysql,sockets没有安装(php -m 检查一下)

留意cacti/log/cacti.log文件

==============================
2010-07-23
spine安装
#wget http://www.cacti.net/downloads/spine/cacti-spine-0.8.7e.tar.gz
#tar zxvf cacti-spine-0.8.7e.tar.gz
#cd cacti-spine-0.8.7e
#./configure
#make
#make install
#vi /usr/local/spine/etc/spine.conf

DB_Host localhost
DB_Database cacti
DB_User cactiuser
DB_Pass cacti
DB_Port 3306

#mv /usr/local/spine/etc/spine.conf /etc/
#/usr/local/spine/bin/spine

SPINE: Using spine config file [/etc/spine.conf]
SPINE: Version 0.8.7e starting
SPINE: Time: 7.3153 s, Threads: 1, Hosts: 11

配置spine
(1)登陆console–Configuration–Settings–poller–Poller Type改为spine
(2)登陆console–Configuration–Settings–paths–Spine Poller File Path添加/usr/local/spine/bin/spine

#tail /opt/htdocs/www/cacti/log/cacti.log
07/23/2010 03:20:02 PM – POLLER: Poller[0] ERROR: The path: /usr/local/spine/bin/spine is invalid. Can not continue #如果你的php有open_basedir限制,需加上/usr/local/spine/bin/目录
07/23/2010 03:25:04 PM – SYSTEM STATS: Time:3.2262 Method:spine Processes:1 Threads:1 Hosts:11 HostsPerProcess:11 DataSources:190 RRDsProcessed:147 #相比php方式快很多

参考:
http://liuyu.blog.51cto.com/183345/259995
http://www.cacti.net/downloads/docs/html/install_unix.html

Posted in Cacti.

Tagged with , , , .