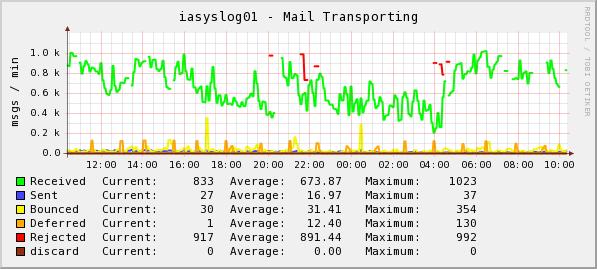
1.下载 postfix_mailserver.tar.gz http://forums.cacti.net/download.php?id=4091 #wget http://forums.cacti.net/download.php?id=4091
2.解压得到两个文件 #tar zxvf postfix_mailserver.tar.gz cacti_host_template_postfix_mailserver.xml fetch_mail_statistics.pl
3.测试程序文件 #chmod 0775 fetch_mail_statistics.pl #cp fetch_mail_statistics.pl /usr/local/postfix/libexec/ #cd !$
/var/log/maillog 为mail日志文件 /var/log/mailstats.db 为程序存放的数据文件 1.3.6.1.4.1.2021.255 为snmp用的oid
#./fetch_mail_statistics.pl /var/log/maillog /var/log/mailstats.db .1.3.6.1.4.1.2021.255 -n .1.3.6.1.4.1.2021.255 .1.3.6.1.4.1.2021.255.0 integer 3
有数字输出就是正确了
4.安装配置snmp snmp的安装和基本配置参考
#vi /usr/local/etc/snmp/snmpd.conf #或者这个位置vi /etc/snmp/snmp.conf
com2sec local localhost c1gprivate group MyROGroup v1 local group MyROGroup v2c local view all included .1 80 access MyROGroup “” any noauth exact all none none #postfix pass .1.3.6.1.4.1.2021.255 /usr/local/postfix/libexec/fetch_mail_statistics.pl /var/log/maillog /var/log/mailstats.db .1.3.6.1.4.1.2021.255重启snmp
5.snmpwalk测试 #snmpwalk -v 1 -c c1gprivate localhost .1.3.6.1.4.1.2021.255
UCD-SNMP-MIB::ucdavis.255.0 = INTEGER: 3 UCD-SNMP-MIB::ucdavis.255.1 = INTEGER: 2 UCD-SNMP-MIB::ucdavis.255.2 = INTEGER: 0 UCD-SNMP-MIB::ucdavis.255.3 = INTEGER: 2 UCD-SNMP-MIB::ucdavis.255.4 = INTEGER: 1 UCD-SNMP-MIB::ucdavis.255.5 = INTEGER: 0 UCD-SNMP-MIB::ucdavis.255.6 = INTEGER: 0 UCD-SNMP-MIB::ucdavis.255.7 = INTEGER: 0 UCD-SNMP-MIB::ucdavis.255.8 = INTEGER: 0 UCD-SNMP-MIB::ucdavis.255.9 = INTEGER: 0 UCD-SNMP-MIB::ucdavis.255.10 = INTEGER: 0#snmpwalk -v 2c -c c1gprivate localhost .1.3.6.1.4.1.2021.255.0
UCD-SNMP-MIB::ucdavis.255.0 = INTEGER: 3出现下面错误请再检查snmpd.conf
#snmpwalk -v 1 -c c1gprivate localhost .1.3.6.1.4.1.2021.255.0 End of MIB #snmpwalk -v2c -c c1gprivate localhost .1.3.6.1.4.1.2021.255.1 UCD-SNMP-MIB::ucdavis.255.1 = No more variables left in this MIB View (It is past the end of the MIB tree)6.cacti导入postfix模板 在cacti控制后台 Console -> Import Templates 导入cacti_host_template_postfix_mailserver.xml 在Console -> Host Templates 可以看到名为”Postfix Mailserver”的模板
7.创建postfix的监控图像
Console -> Devices
选择被控监的服务器,在”Associated Graph Templates”中添加”ucd/net – Postfix – Mail Transporting ”
Console -> Create New Graphs
选择被控监的服务器,勾选”Create: ucd/net – Postfix – Mail Transporting”并保存
Console -> Graph Management 稍后就可以看到图像

其它注意项 1.检查 iptables 是否允许snmp 数据包通过 2.请关闭 selinux (RHEL和centos 会出现这个问题)
参考: http://forums.cacti.net/about6657-0-asc-0.html http://dev.firnow.com/course/6_system/linux/Linuxjs/2008618/126258.html


No Responses (yet)
Stay in touch with the conversation, subscribe to the RSS feed for comments on this post.