Skip to content


cacti 监控 postfix mail server

1.下载 postfix_mailserver.tar.gz http://forums.cacti.net/download.php?id=4091 #wget http://forums.cacti.net/download.php?id=4091

2.解压得到两个文件 #tar zxvf postfix_mailserver.tar.gz cacti_host_template_postfix_mailserver.xml fetch_mail_statistics.pl

3.测试程序文件 #chmod 0775 fetch_mail_statistics.pl #cp fetch_mail_statistics.pl /usr/local/postfix/libexec/ #cd !$

/var/log/maillog 为mail日志文件 /var/log/mailstats.db 为程序存放的数据文件 1.3.6.1.4.1.2021.255 为snmp用的oid

#./fetch_mail_statistics.pl /var/log/maillog /var/log/mailstats.db .1.3.6.1.4.1.2021.255 -n .1.3.6.1.4.1.2021.255 .1.3.6.1.4.1.2021.255.0 integer 3

有数字输出就是正确了

4.安装配置snmp snmp的安装和基本配置参考

#vi /usr/local/etc/snmp/snmpd.conf #或者这个位置vi /etc/snmp/snmp.conf

com2sec local localhost c1gprivate group MyROGroup v1 local group MyROGroup v2c local view all included .1 80 access MyROGroup “” any noauth exact all none none #postfix pass .1.3.6.1.4.1.2021.255 /usr/local/postfix/libexec/fetch_mail_statistics.pl /var/log/maillog /var/log/mailstats.db .1.3.6.1.4.1.2021.255

重启snmp

5.snmpwalk测试 #snmpwalk -v 1 -c c1gprivate localhost .1.3.6.1.4.1.2021.255

UCD-SNMP-MIB::ucdavis.255.0 = INTEGER: 3 UCD-SNMP-MIB::ucdavis.255.1 = INTEGER: 2 UCD-SNMP-MIB::ucdavis.255.2 = INTEGER: 0 UCD-SNMP-MIB::ucdavis.255.3 = INTEGER: 2 UCD-SNMP-MIB::ucdavis.255.4 = INTEGER: 1 UCD-SNMP-MIB::ucdavis.255.5 = INTEGER: 0 UCD-SNMP-MIB::ucdavis.255.6 = INTEGER: 0 UCD-SNMP-MIB::ucdavis.255.7 = INTEGER: 0 UCD-SNMP-MIB::ucdavis.255.8 = INTEGER: 0 UCD-SNMP-MIB::ucdavis.255.9 = INTEGER: 0 UCD-SNMP-MIB::ucdavis.255.10 = INTEGER: 0

#snmpwalk -v 2c -c c1gprivate localhost .1.3.6.1.4.1.2021.255.0

UCD-SNMP-MIB::ucdavis.255.0 = INTEGER: 3

出现下面错误请再检查snmpd.conf

#snmpwalk -v 1 -c c1gprivate localhost .1.3.6.1.4.1.2021.255.0 End of MIB #snmpwalk -v2c -c c1gprivate localhost .1.3.6.1.4.1.2021.255.1 UCD-SNMP-MIB::ucdavis.255.1 = No more variables left in this MIB View (It is past the end of the MIB tree)

6.cacti导入postfix模板 在cacti控制后台 Console -> Import Templates 导入cacti_host_template_postfix_mailserver.xml 在Console -> Host Templates 可以看到名为”Postfix Mailserver”的模板

7.创建postfix的监控图像 Console -> Devices 选择被控监的服务器,在”Associated Graph Templates”中添加”ucd/net – Postfix – Mail Transporting ” Console -> Create New Graphs 选择被控监的服务器,勾选”Create: ucd/net – Postfix – Mail Transporting”并保存 Console -> Graph Management 稍后就可以看到图像 cacti_postfix_mail_transporting_graph
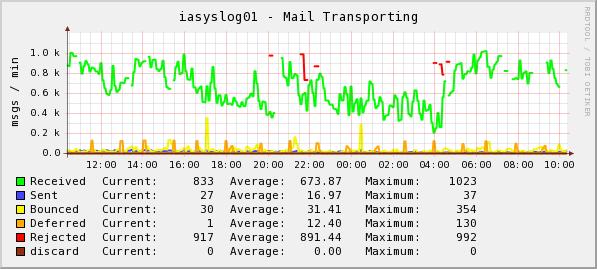
其它注意项 1.检查 iptables 是否允许snmp 数据包通过 2.请关闭 selinux (RHEL和centos 会出现这个问题)

参考: http://forums.cacti.net/about6657-0-asc-0.html http://dev.firnow.com/course/6_system/linux/Linuxjs/2008618/126258.html

Posted in Cacti, 技术.

Tagged with , , .


RedHat AS4 使用centos源 安装yum

RedHat AS4 安装yum

下载rpm http://mirrors.163.com/centos/4/os/i386/CentOS/RPMS/yum-2.4.3-4.el4.centos.noarch.rpm http://mirrors.163.com/centos/4/os/i386/CentOS/RPMS/python-elementtree-1.2.6-5.el4.centos.i386.rpm http://mirrors.163.com/centos/4/os/i386/CentOS/RPMS/sqlite-3.3.6-2.i386.rpm http://mirrors.163.com/centos/4/os/i386/CentOS/RPMS/python-sqlite-1.1.7-1.2.1.i386.rpm http://mirrors.163.com/centos/4/os/i386/CentOS/RPMS/python-urlgrabber-2.9.8-2.noarch.rpm http://mirrors.163.com/centos/4/os/i386/CentOS/RPMS/yum-metadata-parser-1.0-8.el4.centos.i386.rpm ftp://ftp.isu.edu.tw/pub/Linux/CentOS/4.8/os/s390/CentOS/RPMS/centos-yumconf-4-4.5.noarch.rpm

安装yum rpm -ivh centos-yumconf-4-4.5.noarch.rpm rpm -ivh sqlite-3.3.6-2.i386.rpm rpm -ivh python-sqlite-1.1.7-1.2.1.i386.rpm rpm -ivh python-urlgrabber-2.9.8-2.noarch.rpm rpm -ivh python-elementtree-1.2.6-5.el4.centos.i386.rpm rpm -ivh yum-metadata-parser-1.0-8.el4.centos.i386.rpm rpm -ivh yum-2.4.3-4.el4.centos.noarch.rpm

配置yum
cd /etc/yum.repos.d/
wget http://mirrors.163.com/.help/CentOS-Base-163.repo
mv CentOS-Base.repo{1,.bak}
vi CentOS-Base-163.repo
把$releasever替换成4
按esc再输入进行替换
1,$s#\$releasever#4/g 保存退出

yum clean all yum list

Posted in linux 维护优化, 技术.

Tagged with , , .


linux文字终端下的俄罗斯方块游戏

tetrislogo http://victornils.net/tetris/

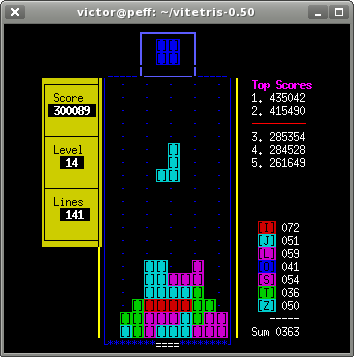
linux文字终端下的俄罗斯方块游戏 支持单人,双人及网络对战。

游戏截图 vitetris050-brackets

双人对战截图 vitetris040-unsock5-sm

下载安装 wget http://victornils.net/tetris/vitetris-0.57.tar.gz tar zxvf vitetris-0.57.tar.gz cd vitetris-0.57 ./configure –prefix=/opt/gamevitetris make make install /opt/gamevitetris/bin/tetris

游戏开始的界面

# # # # # # # # # # # # # # ## # # # # # # # # # # # # 1-Player Game vitetris 0.57 2-Player Game Netplay Written by Mode [A-type] Victor Nilsson ————- 2007-2009 Options Highscores

Posted in Linux游戏.

Tagged with , , .


ssh连接时清除终端shell乱码方法

当用cat或tail命令显示一个二进制文件后终端可能会变成乱码

解决方法:

1.输入clean命令或按ctrl+L

2.输入reset命令

3.按ctrl+v再按ctrl+o 会出现个^O再按回车 ctrl+v 表示下一输入为特殊字符 ctrl+o 表示^O 切换为原来字符集

参考: http://www.cyut.edu.tw/~ckhung/b/mi/textmode.php

Posted in linux 维护优化, 技术.

Tagged with .


nagios 使用check_file.pl 检查服务是否运行

服务运行时通常会产生个pid文件,我们可以检查这个文件是否存在来简单判定服务是否在运行。

http://exchange.nagios.org/directory/Plugins/Uncategorized/Operating-Systems/Linux/checkfile/details

check_file.pl

#!/usr/bin/perl -w ############################## check_file.pl ############## # Version : 0.1 # Date : Oct 15 2007 # Author : Samuel Mutel # Licence : GPL – http://www.fsf.org/licenses/gpl.txt ########################################################### use strict; use Getopt::Long; my $Version=’0.1′; my %ERRORS=(‘OK’=>0,’WARNING’=>1,’CRITICAL’=>2,’UNKNOWN’=>3,’DEPENDENT’=>4); my $o_help=undef; # wan’t some help ? my $o_version=undef; # print version my $o_exist=undef; # Check if file exist my $o_nexist=undef; # Check if a file doesn’t exist my $o_empty=undef; # Check if a file is empty my $o_nempty=undef; # Check if a file is not empty my $o_paramok=undef; sub print_version { print “check_file version : $Version\n”; } sub print_usage { print “Usage: check_file.pl [-v] [-h] [-e|-n|-m|-t] \n”; } sub print_help { print “\nNagios Plugin to check if a file exist/doesn’t exist.\n”; print “It check too if a file is empty or not.\n\n”; print_usage(); print \$o_help, ‘help’ => \$o_help, ‘v’ => \$o_version, ‘version’ => \$o_version, ‘e’ => \$o_exist, ‘exist’ => \$o_exist, ‘n’ => \$o_nexist, ‘nexist’ => \$o_nexist, ‘m’ => \$o_empty, ’empty’ => \$o_empty, ‘t’ => \$o_nempty, ‘nempty’ => \$o_nempty, ); if (defined ($o_help)) { print_help(); exit $ERRORS{“UNKNOWN”}}; if (defined ($o_version)) { print_version(); exit $ERRORS{“UNKNOWN”}}; if (!defined ($o_exist) && !defined ($o_nexist) && !defined ($o_empty) && !defined ($o_nempty)) { print_usage(); exit $ERRORS{“UNKNOWN”}};; } ###### MAIN ###### check_options(); if (@ARGV != 1) { print_usage(); exit $ERRORS{“UNKNOWN”}; } my $file = $ARGV[0]; if (defined ($o_exist)) { if (-e $file) { print “File ” . $file . ” exist.”; exit $ERRORS{“OK”} } else { print “File ” . $file . ” does not exist.”; exit $ERRORS{“CRITICAL”} } } if (defined ($o_nexist)) { if (! -e $file) { print “File ” . $file . ” does not exist.”; exit $ERRORS{“OK”} } else { print “File ” . $file . ” exist.”; exit $ERRORS{“CRITICAL”} } } if (defined ($o_empty)) { if (! -s $file) { print “File ” . $file . ” is empty.”; exit $ERRORS{“OK”} } else { print “File ” . $file . ” is not empty.”; exit $ERRORS{“CRITICAL”} } } if (defined ($o_nempty)) { if (-s $file) { print “File ” . $file . ” is not empty.”; exit $ERRORS{“OK”} } else { print “File ” . $file . ” is empty.”; exit $ERRORS{“CRITICAL”} } }

在被监控机上 wget http://exchange.nagios.org/components/com_mtree/attachment.php?link_id=1094&cf_id=24

mv check_file.pl /usr/local/nagios/libexec/ cd !$ chown nagios:nagios check_file.pl chmod 0775 check_file.pl

#在nrpe.cfg中增加

command[check_msnbot]=/usr/local/nagios/libexec/check_file.pl -e /opt/lampp/htdocs/msnbot/log/msnbot.pid

#重启nrpe ps aux|grep nrpe kill $pid sudo -u nagios /usr/local/nagios/bin/nrpe -c /usr/local/nagios/etc/nrpe.cfg -d

在监控机上 在需要监控的服务器配置文件中增加

define service{ use local-service ; Name of service template to use host_name c1gserver service_description msnbot check_command check_nrpe!check_msnbot notifications_enabled 1 }

重启nagios服务后就可以看到了

service nagios reload

Posted in Nagios, 技术.

Tagged with , .


世界海底光缆分布图

底光缆是国际互联网的骨架。光缆的多少,代表一国与互联网的联系是否紧密。

有人利用微软的Bing地图,以及wikipedia的数据,做出了一幅互动式的世界海底光缆分布图。真是厉害啊。

idc1 我见过的这类地图中,它是最好用的一个。

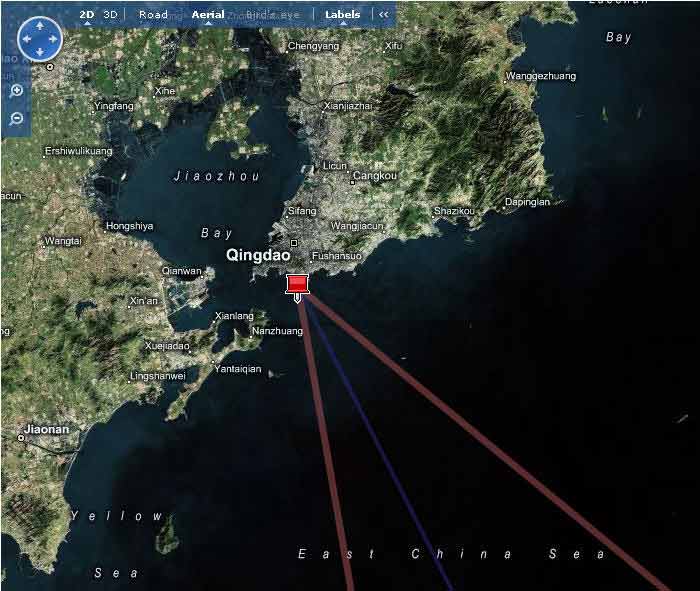
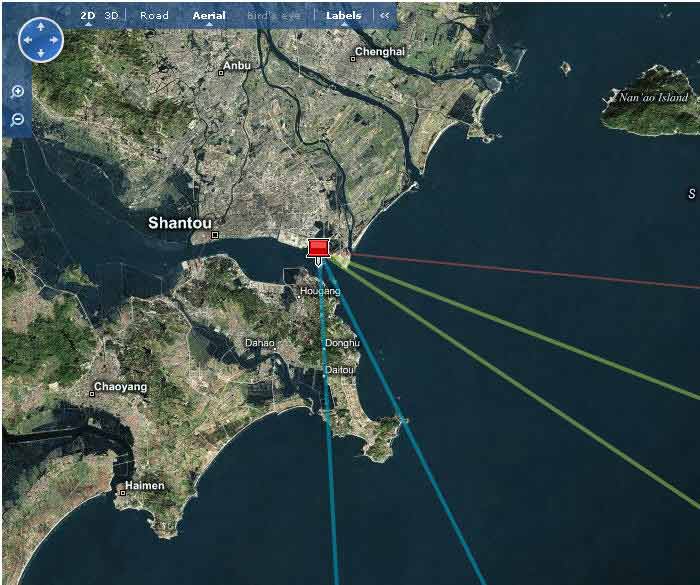
从地图上可以看到,中国大陆的海底光缆连接点只有三个,因此非常容易对出入境的信息进行控制。

idc2

第一个是青岛(2条光缆)。

idc3

第二个是上海(6条光缆)。

id4

第三个是汕头(3条光缆)。

idc5

由于光缆之间存在重合,所以实际上,中国大陆与Internet的所有通道,就是3个入口6条光缆。

  1. APCN2(亚太二号)海底光缆

带宽:2.56Tbps

长度:19000km

经过地区:中国大陆、香港、台湾、日本、韩国、马来西亚、菲律宾。

入境地点:汕头,上海。

网址:http://en.wikipedia.org/wiki/APCN_2_(cable_system)

idc6

  1. CUCN(中美)海底光缆

带宽:2.2Tbps

长度:30000km

经过地区:中国大陆,台湾,日本,韩国,美国。

入境地点:汕头,上海。

网址:http://en.wikipedia.org/wiki/CUCN_(cable_system)

idc7

  1. SEA-ME-WE 3(亚欧)海底光缆

带宽:960Gbps

长度:39000km

经过地区:东亚,东南亚,中东,西欧。

入境地点:汕头,上海。

网址:http://en.wikipedia.org/wiki/SEA-ME-WE_3

idc8

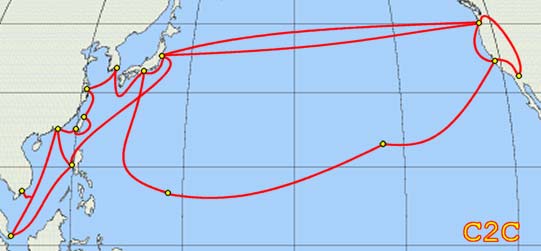
  1. EAC-C2C海底光缆

带宽:10.24Tbps

长度:36800km

经过地区:亚太地区

入境地点:上海,青岛

网址:http://en.wikipedia.org/wiki/C2C_(cable_system)

idc9

  1. FLAG海底光缆

带宽:10Gbps

长度:27000km

经过地区:西欧,中东,南亚,东亚

入境地点:上海

网址: http://en.wikipedia.org/wiki/Fiber-Optic_Link_Around_the_Globe

idc10

  1. Trans-Pacific Express(TPE,泛太平洋)海底光缆

带宽:5.12Tbps

长度:17700km

经过地区:中国大陆,台湾,韩国,美国

入境地点:上海,青岛

网址:http://en.wikipedia.org/wiki/TPE_(cable_system)

idc11

作为比较,台湾有9条光缆,香港和韩国各有11条光缆,而日本至少有11个入口15条光缆。

来源:阮一峰

Posted in IDC, 其它.

Tagged with , .


cacti 监控 mysql status

项目网址 http://code.google.com/p/mysql-cacti-templates/

下载包并取出ss_get_mysql_stats.php 文件

wget http://mysql-cacti-templates.googlecode.com/files/better-cacti-templates-1.1.7.tar.gz tar zxvf better-cacti-templates-1.1.7.tar.gz cd better-cacti-templates-1.1.7/scripts/ cp ss_get_mysql_stats.php /opt/htdocs/www/cacti/scripts/ cd !$ chown www:website ss_get_mysql_stats.php chmod 0775 ss_get_mysql_stats.php vi ss_get_mysql_stats.php

修改 ss_get_mysql_stats.php 中mysql配置

$mysql_user = ‘cacti’; $mysql_pass = ‘cacti’; $cache_dir = “/opt/htdocs/www/cacti/cache/”;

创建缓存目录

cd .. mkdir cache chown www:website cache chmod 0775 cache

mysql 创建用户cacti 给予process 权限,如果要监控InnoDB状态,还必须有”SUPER”权限

CREATE USER ‘cacti’@’192.168.0.1’ IDENTIFIED BY ‘***’; GRANT PROCESS ON * . * TO ‘cacti’@’192.168.0.1’ IDENTIFIED BY ‘***’ WITH MAX_QUERIES_PER_HOUR 0 MAX_CONNECTIONS_PER_HOUR 0 MAX_UPDATES_PER_HOUR 0 MAX_USER_CONNECTIONS 0 ;

在cacti管理界面Import Templates导入 cacti_host_template_x_mysql_server_ht_0.8.6i-sver1.1.7.xml

添加图表 New Graphs 选择已有Devices在Associated Graph Templates中添加 X MySQL Connections GT 然后点击Create按钮 过几分钟就可以看到图表

cacti_mysql

====================2014-10-27更新 支持多端口

  1. 在Console -> Data Templates 找到mysql-cacti-templates的mysql模板, 在这里面把Port的Use Per-Data Source Value (Ignore this Value)选中,意思是由用户输入这个参数的值,然后保存。

  2. 在Console->Data Input Methods内,把所有有关mysql数据项的Port都改成不请允许为空 取消选中Allow Empty Input,保存。

  3. 上面全部改完后,在创建图型的时候会提示输入端口: 输入你自己的mysql server端口。然后点create就好了。

参考 http://xok.la/2009/05/cacti_mysql_monitor.html http://www.linuxidc.com/Linux/2011-08/41438.htm

Posted in Cacti, 技术.

Tagged with , , .


cacti 监控 nginx status 支持ip及用户验证

Cacti监控主机:192.168.0.1

Nginx被监控服务器:192.168.0.2

1。首先在编译nginx时允许http_stub_status_module,不然是监控不到nginx的运行状态的

2。编辑配置文件,在要监控的虚拟主机里加入如下内容:

vi /opt/nginx/conf/nginx.conf

###nginx monitor location /nginx_status { stub_status on; access_log off; allow 192.168.0.1; deny all; }

3。重新加载nginx的配置文件

/etc/init.d/nginx restart

4。下载cacti for nginx插件包

wget http://forums.cacti.net/download.php?id=12676

解压后一共有5个文件

tar xvfz cacti-nginx.tar.gz

cp get_nginx_clients_status.pl

/scripts/ cp get_nginx_socket_status.pl /scripts/ chmod 0755 /scripts/get_nginx_socket_status.pl chmod 0755 /scripts/get_nginx_clients_status.pl 5。 检查插件 get_nginx_clients_status.pl http://nginx.server.tld/nginx_status 可以看到如下返回: nginx_accepts:113869 nginx_handled:113869 nginx_requests:122594 6。在后台导入模板文件Import Templates-> Import Template from Local File 把2个监控模板文件导入 cacti_graph_template_nginx_clients_stat.xml cacti_graph_template_nginx_sockets_stat.xml 7。添加图表 New Graphs 选择已有Devices在Associated Graph Templates中添加 Nginx Clients Stat 保存后输入地址如:http://192.168.0.2/nginx 过几分钟就可以看到图表 nginx status 带身份认证 auth_basic “Web_ADMIN”; auth_basic_user_file htpasswd; 方法一: 使用带认证的地址 http://username:[email protected]/nginx 方法二: 修改下get_nginx_clients_status.pl ,把adminname和password换成你的。 适用于所有的主机都使用相同的用户和密码。 15 my $ua = LWP::UserAgent->new(timeout => 5); 16 my $req = HTTP::Headers->new; 17 $req = HTTP::Request->new(GET => $ARGV[0]); 18 19 $req->authorization_basic(‘adminname’,’password’); 20 21 #my $response = $ua->request(HTTP::Request->new(‘GET’,$ARGV[0])); 22 my $response = $ua->request($req); 23 24 my @content = split (/\n/, $response->content); cacti_nginx 参考: http://forums.cacti.net/about26458.html http://www.sitepoint.com/forums/showthread.php?t=597455

Posted in Cacti, 技术.

Tagged with , , .


wordpress open_basedir restriction in effect问题

nginx-0.8.46 php-5.2.14 mysql-5.1.37 eaccelerator-0.9.6.1 wordpress 为官方3.0英文版

安装后在页面出现错误信息

Warning: require() [function.require]: open_basedir restriction in effect. File() is not within the allowed path(s): (/opt/htdocs:/opt/lampp/htdocs:/opt/php/lib/php:/tmp/session:/tmp/upload) in /opt/lampp/htdocs/wordpress/wp-settings.php on line 132

php.ini 中的配置也没错

open_basedir = “/opt/htdocs:/opt/lampp/htdocs:/opt/php/lib/php:/tmp/session:/tmp/upload”

关闭open_basedir或去掉[eaccelerator]之后不会报错,安全起见open_basedir一定要开,eaccelerator换成0.9.5.3后没问题了。

tar jxvf eaccelerator-0.9.5.3.tar.bz2 cd eaccelerator-0.9.5.3/ /opt/php/bin/phpize ./configure –enable-eaccelerator=shared –with-php-config=/opt/php/bin/php-config make make install

参考: http://linux.chinaunix.net/bbs/redirect.php?tid=1162653&goto=lastpost

Posted in PHP, 技术.

Tagged with , , .


Linux下硬盘检测工具smartmontools(smartctl)使用方法

安装: yum install smartmontools

help: #smartctl –help smartctl version 5.38 [i686-redhat-linux-gnu] Copyright (C) 2002-8 Bruce Allen Home page is http://smartmontools.sourceforge.net/

Usage: smartctl [options] device

============================================ SHOW INFORMATION OPTIONS =====

-h, –help, –usage Display this help and exit

-V, –version, –copyright, –license Print license, copyright, and version information and exit

-i, –info
Show identity information for device

-a, –all
Show all SMART information for device

================================== SMARTCTL RUN-TIME BEHAVIOR OPTIONS =====

-q TYPE, –quietmode=TYPE (ATA) Set smartctl quiet mode to one of: errorsonly, silent, noserial

-d TYPE, –device=TYPE Specify device type to one of: ata, scsi, marvell, sat, 3ware,N

-T TYPE, –tolerance=TYPE (ATA) Tolerance: normal, conservative, permissive, verypermissive

-b TYPE, –badsum=TYPE (ATA) Set action on bad checksum to one of: warn, exit, ignore

-r TYPE, –report=TYPE Report transactions (see man page)

-n MODE, –nocheck=MODE (ATA) No check if: never, sleep, standby, idle (see man page)

============================== DEVICE FEATURE ENABLE/DISABLE COMMANDS =====

-s VALUE, –smart=VALUE Enable/disable SMART on device (on/off)

-o VALUE, –offlineauto=VALUE (ATA) Enable/disable automatic offline testing on device (on/off)

-S VALUE, –saveauto=VALUE (ATA) Enable/disable Attribute autosave on device (on/off)

======================================= READ AND DISPLAY DATA OPTIONS =====

-H, –health Show device SMART health status

-c, –capabilities (ATA) Show device SMART capabilities

-A, –attributes
Show device SMART vendor-specific Attributes and values

-l TYPE, –log=TYPE Show device log. TYPE: error, selftest, selective, directory, background, scttemp[sts,hist]

-v N,OPTION , –vendorattribute=N,OPTION (ATA) Set display OPTION for vendor Attribute N (see man page)

-F TYPE, –firmwarebug=TYPE (ATA) Use firmware bug workaround: none, samsung, samsung2, samsung3, swapid

-P TYPE, –presets=TYPE (ATA) Drive-specific presets: use, ignore, show, showall

============================================ DEVICE SELF-TEST OPTIONS =====

-t TEST, –test=TEST Run test. TEST: offline short long conveyance select,M-N pending,N afterselect,[on|off] scttempint,N[,p]

-C, –captive Do test in captive mode (along with -t)

-X, –abort Abort any non-captive test on device

=================================================== SMARTCTL EXAMPLES =====

smartctl –all /dev/hda (Prints all SMART information)

smartctl –smart=on –offlineauto=on –saveauto=on /dev/hda (Enables SMART on first disk)

smartctl –test=long /dev/hda (Executes extended disk self-test)

smartctl –attributes –log=selftest –quietmode=errorsonly /dev/hda (Prints Self-Test & Attribute errors) smartctl –all –device=3ware,2 /dev/sda smartctl –all –device=3ware,2 /dev/twe0 smartctl –all –device=3ware,2 /dev/twa0 (Prints all SMART info for 3rd ATA disk on 3ware RAID controller) smartctl –all –device=hpt,1/1/3 /dev/sda (Prints all SMART info for the SATA disk attached to the 3rd PMPort of the 1st channel on the 1st HighPoint RAID controller)

简单用法: 1、smartctl -a

检查该设备是否已经打开SMART技术。 2、smartctl -s on 如果没有打开SMART技术,使用该命令打开SMART技术。 3、smartctl -t short 后台检测硬盘,消耗时间短; smartctl -t long 后台检测硬盘,消耗时间长; smartctl -C -t short 前台检测硬盘,消耗时间短; smartctl -C -t long 前台检测硬盘,消耗时间长。其实就是利用硬盘SMART的自检程序。 4、smartctl -X 中断后台检测硬盘。 5、smartctl -l selftest 显示硬盘检测日志。 6、smartctl -l error 显示硬盘错误汇总。

Posted in Linux 命令, 技术.

Tagged with , .