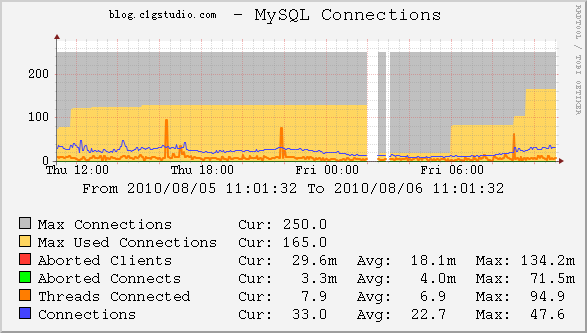
项目网址 http://code.google.com/p/mysql-cacti-templates/
下载包并取出ss_get_mysql_stats.php 文件
wget http://mysql-cacti-templates.googlecode.com/files/better-cacti-templates-1.1.7.tar.gz tar zxvf better-cacti-templates-1.1.7.tar.gz cd better-cacti-templates-1.1.7/scripts/ cp ss_get_mysql_stats.php /opt/htdocs/www/cacti/scripts/ cd !$ chown www:website ss_get_mysql_stats.php chmod 0775 ss_get_mysql_stats.php vi ss_get_mysql_stats.php修改 ss_get_mysql_stats.php 中mysql配置
$mysql_user = ‘cacti’; $mysql_pass = ‘cacti’; $cache_dir = “/opt/htdocs/www/cacti/cache/”;创建缓存目录
cd .. mkdir cache chown www:website cache chmod 0775 cachemysql 创建用户cacti 给予process 权限,如果要监控InnoDB状态,还必须有”SUPER”权限
CREATE USER ‘cacti’@’192.168.0.1’ IDENTIFIED BY ‘***’; GRANT PROCESS ON * . * TO ‘cacti’@’192.168.0.1’ IDENTIFIED BY ‘***’ WITH MAX_QUERIES_PER_HOUR 0 MAX_CONNECTIONS_PER_HOUR 0 MAX_UPDATES_PER_HOUR 0 MAX_USER_CONNECTIONS 0 ;在cacti管理界面Import Templates导入 cacti_host_template_x_mysql_server_ht_0.8.6i-sver1.1.7.xml
添加图表 New Graphs 选择已有Devices在Associated Graph Templates中添加 X MySQL Connections GT 然后点击Create按钮 过几分钟就可以看到图表
====================2014-10-27更新 支持多端口
-
在Console -> Data Templates 找到mysql-cacti-templates的mysql模板, 在这里面把Port的Use Per-Data Source Value (Ignore this Value)选中,意思是由用户输入这个参数的值,然后保存。
-
在Console->Data Input Methods内,把所有有关mysql数据项的Port都改成不请允许为空 取消选中Allow Empty Input,保存。
-
上面全部改完后,在创建图型的时候会提示输入端口: 输入你自己的mysql server端口。然后点create就好了。
参考 http://xok.la/2009/05/cacti_mysql_monitor.html http://www.linuxidc.com/Linux/2011-08/41438.htm


No Responses (yet)
Stay in touch with the conversation, subscribe to the RSS feed for comments on this post.