环境介绍 安装cacti的监控机A,ip为 192.168.0.16 安装snmp的被监控机B,ip为 192.168.0.17 系统为centos 4/5
被监控B机安装snmp net-snmp 安装参考
修改B机snmp配置,充许外部访问 自带的snmp配置文件在/etc/snmp/snmpd.conf; 编译安装的snmp配置文件在/usr/local/etc/snmp/snmpd.conf; vi /etc/snmp/snmpd.conf
com2sec local localhost privatepass #安装教程中配置的本机访问要权限 com2sec mynetwork 192.168.0.16 privatepass #新增的外部访问权限,192.168.0.16为监控机ip,privatepass 为安全码可以和local不同 group MyROGroup v1 local group MyROGroup v2c local group MyROGroupnet v1 mynetwork #新增 group MyROGroupnet v2c mynetwork #新增 view mib2 included .iso.org.dod.internet.mgmt.mib-2 fc view all included .1 80 #新增 access MyROGroup “” any noauth exact mib2 none none access MyROGroupnet “” any noauth exact all none none #新增 #以下为访问项目,如果想监控磁盘空间,load等需把注释去掉 #编译安装默认已去掉,自带安装的需手动把注释去掉 # Make sure mountd is running proc mountd #去掉前面的”#” # Make sure there are no more than 4 ntalkds running, but 0 is ok too. proc ntalkd 4 # Make sure at least one sendmail, but less than or equal to 10 are running. proc sendmail 10 1 # Check the / partition and make sure it contains at least 10 megs. disk / 10000 # Check for loads: load 12 14 14重启snmpd服务 #/etc/init.d/snmpd restart 或 #killall -9 snmpd #/usr/local/sbin/snmpd
iptables规则 假如B机开启了iptables并且INPUT默认策略为DROP 在第一条插入充许192.168.0.16(监控机)以udp协议访问snmpd默认161端口的规则
/sbin/iptables -I INPUT -p udp -m udp -s 192.168.0.16 –dport 161 -j ACCEPT保存一下,防止重启服务后失效
/etc/init.d/iptables save测试snmp 在A机上先看下系统信息 #snmpwalk -v 2c -c privatepass 192.168.0.17 system
SNMPv2-MIB::sysDescr.0 = STRING: Linux touareg 2.6.18-128.el5 #1 SMP Wed Jan 21 10:41:14 EST 2009 x86_64 SNMPv2-MIB::sysObjectID.0 = OID: NET-SNMP-MIB::netSnmpAgentOIDs.10 DISMAN-EVENT-MIB::sysUpTimeInstance = Timeticks: (59664) 0:09:56.64 SNMPv2-MIB::sysContact.0 = STRING: Root (configure /etc/snmp/snmp.local.conf) SNMPv2-MIB::sysName.0 = STRING: touareg SNMPv2-MIB::sysLocation.0 = STRING: Unknown (edit /etc/snmp/snmpd.conf) SNMPv2-MIB::sysORLastChange.0 = Timeticks: (7) 0:00:00.07 SNMPv2-MIB::sysORID.1 = OID: SNMPv2-MIB::snmpMIB SNMPv2-MIB::sysORID.2 = OID: TCP-MIB::tcpMIB SNMPv2-MIB::sysORID.3 = OID: IP-MIB::ip SNMPv2-MIB::sysORID.4 = OID: UDP-MIB::udpMIB SNMPv2-MIB::sysORID.5 = OID: SNMP-VIEW-BASED-ACM-MIB::vacmBasicGroup SNMPv2-MIB::sysORID.6 = OID: SNMP-FRAMEWORK-MIB::snmpFrameworkMIBCompliance SNMPv2-MIB::sysORID.7 = OID: SNMP-MPD-MIB::snmpMPDCompliance SNMPv2-MIB::sysORID.8 = OID: SNMP-USER-BASED-SM-MIB::usmMIBCompliance SNMPv2-MIB::sysORDescr.1 = STRING: The MIB module for SNMPv2 entities SNMPv2-MIB::sysORDescr.2 = STRING: The MIB module for managing TCP implementations SNMPv2-MIB::sysORDescr.3 = STRING: The MIB module for managing IP and ICMP implementations SNMPv2-MIB::sysORDescr.4 = STRING: The MIB module for managing UDP implementations SNMPv2-MIB::sysORDescr.5 = STRING: View-based Access Control Model for SNMP. SNMPv2-MIB::sysORDescr.6 = STRING: The SNMP Management Architecture MIB. SNMPv2-MIB::sysORDescr.7 = STRING: The MIB for Message Processing and Dispatching. SNMPv2-MIB::sysORDescr.8 = STRING: The management information definitions for the SNMP User-based Security Model. SNMPv2-MIB::sysORUpTime.1 = Timeticks: (6) 0:00:00.06 SNMPv2-MIB::sysORUpTime.2 = Timeticks: (6) 0:00:00.06 SNMPv2-MIB::sysORUpTime.3 = Timeticks: (6) 0:00:00.06 SNMPv2-MIB::sysORUpTime.4 = Timeticks: (6) 0:00:00.06 SNMPv2-MIB::sysORUpTime.5 = Timeticks: (6) 0:00:00.06 SNMPv2-MIB::sysORUpTime.6 = Timeticks: (7) 0:00:00.07 SNMPv2-MIB::sysORUpTime.7 = Timeticks: (7) 0:00:00.07 SNMPv2-MIB::sysORUpTime.8 = Timeticks: (7) 0:00:00.07没有问题,再看下磁盘信息 #snmpwalk -v 2c -c privatepass 192.168.0.17 .1.3.6.1.4.1.2021.9
UCD-SNMP-MIB::dskIndex.1 = INTEGER: 1 UCD-SNMP-MIB::dskPath.1 = STRING: / UCD-SNMP-MIB::dskDevice.1 = STRING: /dev/mapper/VolGroup00-LogVol01 UCD-SNMP-MIB::dskMinimum.1 = INTEGER: 10000 UCD-SNMP-MIB::dskMinPercent.1 = INTEGER: -1 UCD-SNMP-MIB::dskTotal.1 = INTEGER: 44628400 UCD-SNMP-MIB::dskAvail.1 = INTEGER: 22383404 UCD-SNMP-MIB::dskUsed.1 = INTEGER: 19941408 UCD-SNMP-MIB::dskPercent.1 = INTEGER: 47 UCD-SNMP-MIB::dskPercentNode.1 = INTEGER: 1 UCD-SNMP-MIB::dskErrorFlag.1 = INTEGER: noError(0) UCD-SNMP-MIB::dskErrorMsg.1 = STRING:出现下面这个信息,你需要检查下A机snmpd.conf中“disk / 10000”前的注释有无去掉。
UCD-SNMP-MIB::dskTable = No Such Object available on this agent at this OID“.1.3.6.1.4.1.2021.9″代表磁盘 “.1.3.6.1.4.1.2021.10″代表load,可以参考snmpd.conf中的注释
监控机cacti增加监控设备
Console -> Devices->add
 在设置页面配置
Description:touareg Hostname:192.168.0.17 Host Template:ucd/net SNMP Host Downed Device Detection:Ping and SNMP SNMP Version:预定义的设置
保存后在页面左上角可以看到调试信息
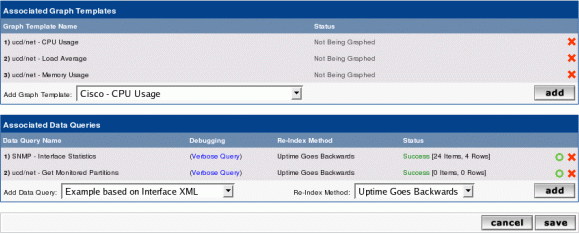
touareg (192.168.0.17) SNMP Information System:Linux touareg 2.6.18-128.el5 #1 SMP Wed Jan 21 10:41:14 EST 2009 x86_64 Uptime: 38790 (0 days, 0 hours, 6 minutes) Hostname: touareg Location: Unknown (edit /etc/snmp/snmpd.conf) Contact: Root root@localhost (configure /etc/snmp/snmp.local.conf) 1) ucd/net – CPU Usage Not Being Graphed (cpu负载,system,user,nice)
2) ucd/net – Load Average Not Being Graphed (系统平均负载,1分钟,5分钟,15分钟)
3) ucd/net – Memory Usage Not Being Graphed (内存使用,free,buffers,cache)
1) SNMP – Interface Statistics (网卡流量,in,out)
2) ucd/net – Get Monitored Partitions (根分区,free,used)
Not Being Graphed 表示还末生成图像,创建图像后会变成Is Being Graphed
我们可以再添加一些更详细的监控
Host MIB – Processes 监控进程数量
Host MIB – Logged in Users 监控登录用户
SNMP – Get Mounted Partitions 更多分区大小,Memory Buffer,Real Memory,Swap Space
SNMP – Get Processor Information 每个cpu的负载
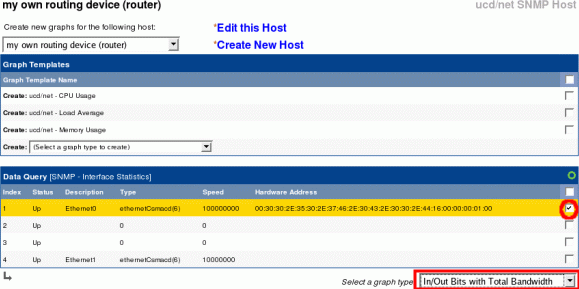
临控对像增加图表
左则New Graphs
在host中选择touareg
 勾选右则后选择create,就完成了图表创建,真是很方便。
添加到Graph Trees
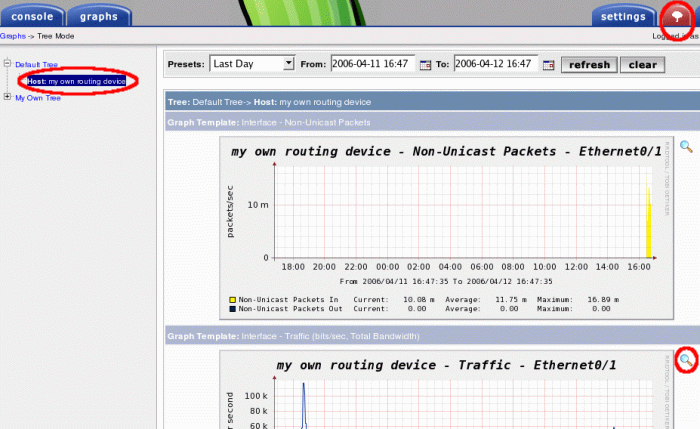
图表创建后在Graph Management里可以看到图表,但点击导航上方的”graphs”是看不到的,需要添加到graph trees中。
Console -> Graph Trees -> (Edit) -> Graph Tree Items
Tree Item Type:host Host:touareg创建后就可以在graph中看到了
 参考:http://docs.cacti.net/manual:087:2_basics.0_principles_of_operation#principles_of_operation


No Responses (yet)
Stay in touch with the conversation, subscribe to the RSS feed for comments on this post.